微信小程序初试-----音乐Demo

微信小程序最近很火,所以我也来试试这个东东,看看它跟我们平时的Html5有什么区别?
官方有提供下载和新建项目的教程,这里就不重复,可以先查看这里和下载:请猛戳我
项目文件目录结构
新建项目后,默认的如下
    pages //所有页面(也可以叫窗口)存放的文件夹
        |--index //默认显示的第一个页面(窗口)
            |--index.js    //页面的脚本逻辑
            |--index.wxml  //页面结构内容
            |--index.wxss  //页面样式
        |--logs //另外一个页面,结构跟上面类似
    utils  //工具文件夹
        |--util.js //工具类
    app.js //项目启动的主入口文件
    app.json  //项目的主配置文件
    app.wxss  //项目公共默认样式
页面中的三个文件:js、wxml、wxss,其实就是微信版的js、html、css,在此基础上增加了一些微信特有的东西上去
一、配置顶条和底部导航
小程序的底部导航和顶条,是需要使用
app.json配置文件来配置
    {
      "pages":[ //配置小程序中全部的页面地址,必须全都写在这里
        "pages/index/index",  //路径就是上面结构,去掉最后的后缀
        "pages/logs/logs"
      ],
      "window":{  //配置顶条内容
        "backgroundTextStyle":"light", //文本样式,只有light和dark
        "navigationBarBackgroundColor": "#000", //顶条背景色
        "navigationBarTitleText": "音乐Demo", //顶条标题
        "navigationBarTextStyle":"white" //顶条文字颜色
      },
      "tabBar": { //底部导航配置
        "color" : "black", //导航文字颜色
        "selectedColor" : "blue", //导航被选中的文字颜色
        "backgroundColor" : "white", //导航背景色
        "list": [{ //导航列表
          "pagePath": "pages/index/index", //点击后跳转的页面地址,需要上面有配置
          "text": "首页", //导航标题
          "iconPath" : "img/user.png", //导航对应的默认icon
          "selectedIconPath" : "img/user.png" //导航被选中时的icon
        }, {
          "pagePath": "pages/logs/logs",
          "text": "日志",
          "iconPath" : "img/lock.png",
          "selectedIconPath" : "img/lock.png"
        }]
      }
    }
二、样式wxss
小程序是使用后缀名为
.wxss的样式文件,总体来说跟平时写的css差不多,显示的效果也类似,可以理解是移动端web的开发
    .title {
      padding-top:20rpx;
      padding-bottom: 5rpx;
      width: 100%;
      text-align: center;
      border-bottom:1rpx solid #aaa;
    }

    .list-scroll{

      height:1080rpx;
    }
    .list {
      overflow: hidden;
      padding:20rpx;
      border-bottom: 1rpx solid #ddd;
    }
    .list.select {
      color : green;
    }
    .list .icon{
      width:50rpx;
      height:50rpx;
      border-radius: 50%;
      background-color:#FF7200;
      float: left;
      text-align: center;
      line-height: 50rpx;
    }
    .list .icon.nobg{
      background: none;
    }
    .list .name {
      float:left;
      margin-left:10rpx;
    }

    .play-controller {
      position:fixed;
      bottom:0;
      left:0;
      width:100%;
      height:100rpx;
      background-color: black;
    }
    .play-controller image {
      width:100rpx;
      height:100rpx;
      float:left;
    }
    .play-controller text{
      color:white;
      float: left;
      margin:20rpx 0 0 20rpx;
    }
这里会比平时多出一个单位:rpx,跟我们px很像,可以理解为rem和px的结合版,默认1rpx=1px,在宽度是750px的情况下。其余按照比例等比例缩放,所以我们开发的时候也可以使用rpx这个单位
三、结构wxml
小程序使用跟html语言类似的标记语言,不过多数html的标记是不能使用的,需要使用微信固有的那些
    <view class="container"> //用view代替div
      <view class="title">酷狗500强</view>

      <loading hidden="{{!isload}}"> //加载组件,会在居中显示一个加载动画
        加载中...
      </loading>

      <scroll-view class="list-scroll" scroll-y="true" bindscrolltolower="scrollEnd"> //带滚动条的div,显示音乐列表

        <block wx:for="{{list}}" wx:for-item="song" wx:for-index="index"> //block就是用来组合view用
          <view class="list {{index == playIndex?'select':''}}" data-id="js_{{index}}" data-hash="{{song.hash}}" bindtap="playSong">

            <view class="icon nobg" wx:if="{{index == playIndex}}">
                <icon type="success" size="25"/> //icon组件,显示微信内置的几个小图标
            </view>
            <view class="icon" wx:else>{{index+1}}</view>
            <text class="name">{{song.filename}}</text> //文本组件,作用类似span
          </view>
        </block>

      </scroll-view>

      <view class="play-controller" wx:if="{{playIndex > -1}}"> //这里是显示音乐播放的控制
        <image src="{{play.src}}"></image>
        <text>{{play.name}}</text>
      </view>

    </view>
如果你接触过vue.js、react、angularjs这类mvvm框架的话,上面标签代码就很容易看懂了,模板语法直接写在标签上面,简单介绍一下:
{{}}这种表示使用或者输出变量内容wx:if表示用条件判断wx:for表示循环
变量从哪来的?当然是写在js里面
四、逻辑js
js代码跟原生js的差不多,多了些微信的API调用,其他暂时没发现
    //默认js的内容
    Page({
      //data内的变量就是给上面wxml使用的
      data: {
        list : [],
        playIndex : -1,
        isload : true,
        page : 1,
        play : {},
        action : {}
      },
      //页面打开完毕后调用的回调
      onLoad: function () {
      }
    })
1、加载音乐列表
这里调用的kugou的接口,微信调用是不存在跨域问题,可以随意调用
    onLoad : function(){

        var that = this;
        //使用微信提供的wx.request拉取接口数据
        wx.request({
          url: 'http://m.kugou.com/rank/info/',
          data: {
            rankid : 8888,
            page : that.data.page,
            json : true
          },
          header: {
              'Content-Type': 'application/json'
          },
          //接口请求成功后回调
          success: function(res) {
            //使用this.setData方法,修改data的数据,修改完后,页面会自动刷新使用新的数据
            //设置歌曲列表,设置加载动画为false,这样就加载动画就会消失
            that.setData({
              list : res.data.songs.list,
              isload : false
            });
          }
        });
    }
2、播放音乐
这里需要做三件事情才能完成播放音乐
2.1 绑定点击事件
<view class="list {{index == playIndex?'select':''}}" data-id="js_{{index}}" data-hash="{{song.hash}}" bindtap="playSong">
事件绑定是在wxml中绑定,其中bindtap属性,就是指点击事件,属性值就是绑定的方法,方法定义是在js中
2.2 设置对应的回调事件
    Page({
        data : {},
        playSong : function(){

        }
    });
事件绑定,就是定义一个函数跟data同级就可以了,这样就能关联起来
2.3 调用接口,播放音乐
    //获取歌曲的id,id值是在标签上的data-hash值上
    var hash = param.currentTarget.dataset.hash;
    //调用接口,获取歌曲实际的MP3地址
     wx.request({
      url : "http://m.kugou.com/app/i/getSongInfo.php",
      data : {
        cmd : "playInfo",
        hash : hash,
        from : "mkugou"
      },
      header: {
          'Content-Type': 'application/json'
      },
      success : function(ret){
        var url = ret.data.url;
        //设置正在播放的歌曲
        that.setData({
          playIndex : index,
          name : that.data.list[index].filename,
        });
        //调用微信的API,播放背景音乐
        wx.playBackgroundAudio({
           dataUrl: url,
           title: that.data.list[index].filename
         });
     });
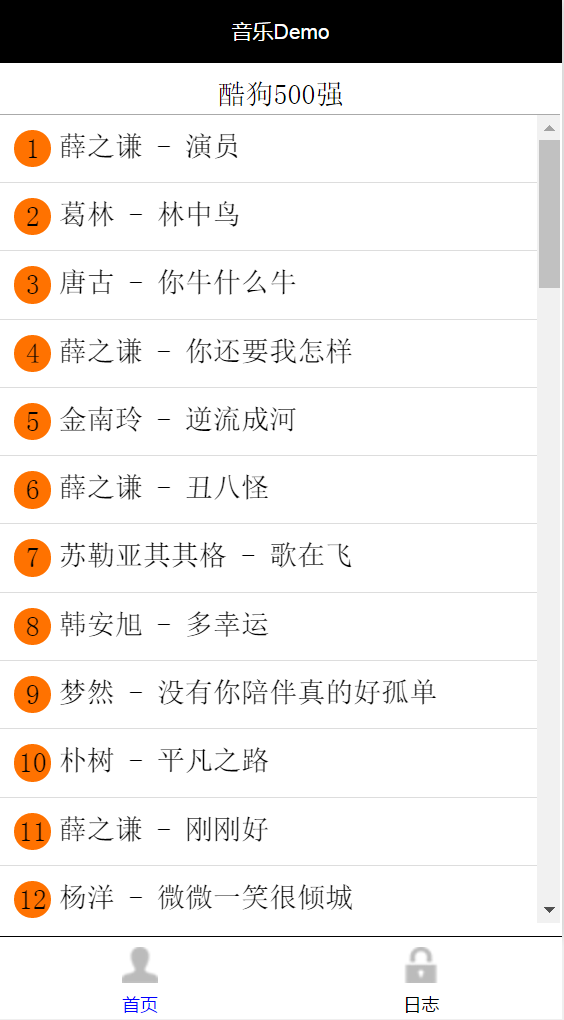
五、效果预览
后记
UI做得不咋滴,没用开源的一些CSS库
微信小程序目前还处于测试阶段,开发模式上是借鉴mvvm框架,但由于不能操作dom,也不是基于浏览器的,所以也不能操作window和document这些,目前大部分的js库都无法使用,css的库,还是可以用,毕竟px和rem单位目前还能使用。
手机阅读请扫描下方二维码:
可以简单的为小程序重构一下css库 不过不知道css3的支持效果如何
1
1
1
1
1
1
1
1
1
1
1
1
1
1
1
1
12345678


12345678


1
12345678


12345678


12345678


12345678


12345678


12345678


12345678


1


1


555
1


1


1


1


1


1


1


1
1
1
1
1
1
1
1
1
1
1
1
1
1
1
1
1
1
1
1
1
1
1